The ideas and projects I make for my home are a huge source of inspiration for this blog, so today I want to share with you all a pretty centerpiece I made using a tin bucket, flowers, and chalkboard paint.


The best thing about this project is that you can use it for a variety of events: baby showers, receptions, weddings, birthday gifts, etc. The possibilities are endless. The centerpiece is easy to arrange, and you can change the flowers and writing throughout the year.
Supplies:
- Tin Bucket
- Artificial Flowers
- Dry Floral Foam
- Chalkboard Paint
- Stencil
- Chalk Marker
- Masking Tape
- Paint Brush

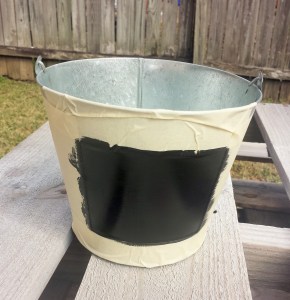
1. Use the masking tape to make a square on the front of the pail.
2. Paint inside the square with chalkboard paint. Apply two coats. Let each coat dry for an hour. Remove tape once paint is completely dry.

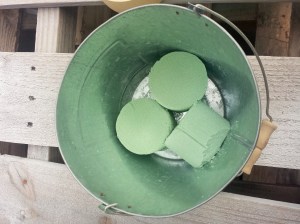
3. Cut the dry floral foam into half pieces, and push them inside the bucket. The floral foam will help keep the flowers in place.

4. Begin pushing flowers into the foam pieces inside the bucket. You may have to bend the flower stems some to get the flowers at the length you want.


5. Use a stencil (optional) and a chalk marker to write on the chalkboard paint.
The centerpiece is ready to display once the chalk dries. Enjoy!


Leave a comment